You’ve tried making Hingagyi before.
And it didn’t taste right.
Maybe the sauce was too thin. Or the tofu fell apart. Or you stared at that jar of fermented soybean paste wondering if you’d ruined everything.
I get it. How to Make Hingagyi Step by Step shouldn’t mean decoding a secret language.
This isn’t theory. I’ve made this dish weekly for over a decade. Tested every shortcut.
Every mistake. Every “why did that curdle?” moment.
No guessing. No vague “add until it looks right.”
Just clear steps. Exact timing. Real talk about what actually matters (spoiler: it’s not the brand of chili oil).
You’ll make Hingagyi that tastes like home. Even if you’ve never set foot in Myanmar.
And you’ll do it on your first try.
Step 1: Assembling Your Authentic Ingredients
I don’t buy the “just use what’s in your pantry” advice for Hingagyi. It backfires every time.
Hingagyi starts with dried shrimp paste (ngapi.) Not fish sauce. Not miso. Ngapi. It’s pungent, funky, and non-negotiable.
Skip it and you’re making something else.
You’ll also need fresh lemongrass, galangal, and kaffir lime leaves. Not the dried kind. Not the frozen cubes.
Fresh. They’re why the broth tastes alive instead of flat.
Find them at any Southeast Asian market. If you’re stuck, check the refrigerated herb section of big supermarkets. Look near the cilantro and mint.
Substitute dried lemongrass? Fine. But soak it 30 minutes first.
And know it’ll taste quieter. Less sharp. Less there.
Garlic and shallots must be raw. Not roasted, not powdered. I mince them by hand.
A food processor mashes them. You want texture, not sludge.
Pro-Tip: Dice your vegetables the same size. Not “roughly.” Same. Size.
Carrots, potatoes, green beans. All cut to ½-inch pieces. Why?
Because uneven pieces cook at different speeds. One bites into mush while another crunches like a raw potato.
You’ll need tamarind paste too. Not concentrate. Not juice.
Paste. Look for the brown block in the Asian aisle. Soak a thumb-sized piece in warm water, then squeeze.
This is how to make Hingagyi step by step. But only if you start right.
No shortcuts on ingredients. None.
Your broth will tell you if you cheated.
Step 2: The Filling (Where) Flavor Gets Serious
I heat a heavy skillet over medium-high. No oil yet. Not until the meat hits the pan.
I add ground pork (or beef (but) pork wins). I break it up with a wooden spoon. I don’t stir constantly.
I let it sit for 30 seconds. That’s how you get color. That’s how you get umami depth.
Garlic goes in next. Minced fine. Then onion (diced) small.
I cook them after the meat is browned and drained. Why? Because raw aromatics steam in fat.
You want sizzle, not sweat.
I drain every drop of fat. Seriously. I tilt the pan.
Spoon it out. Soggy filling starts right here (with) laziness. That fat turns into steam inside the wrapper.
Steam tears dough. Every time.
Then I add carrots and green beans. Not raw. Not frozen-thawed-soggy.
Fresh. Diced small. I cook them just until they lose their crunch.
Two minutes. Maybe three.
Fish sauce. A splash. Sugar.
A pinch. Black pepper. Just that.
No soy sauce. It dulls the brightness.
I taste. Always. Right there.
With a clean spoon. Is it salty enough? Does it need more fish sauce?
More sugar to balance? I adjust. Not later.
Now.
Then I stop cooking. I dump it onto a rimmed baking sheet. I spread it thin.
I walk away.
Letting it cool completely isn’t optional. It’s non-negotiable. Warm filling melts the wrapper’s structure.
Cold filling holds its shape. Cold filling doesn’t weep moisture into the dough.
This is where most people rush. And fail.
How to Make Hingagyi Step by Step means respecting temperature as much as seasoning.
You think cooling is passive? It’s active control. It’s the difference between tender folds and a sticky, torn mess.
Try wrapping warm filling once. Just once. Then tell me you disagree.
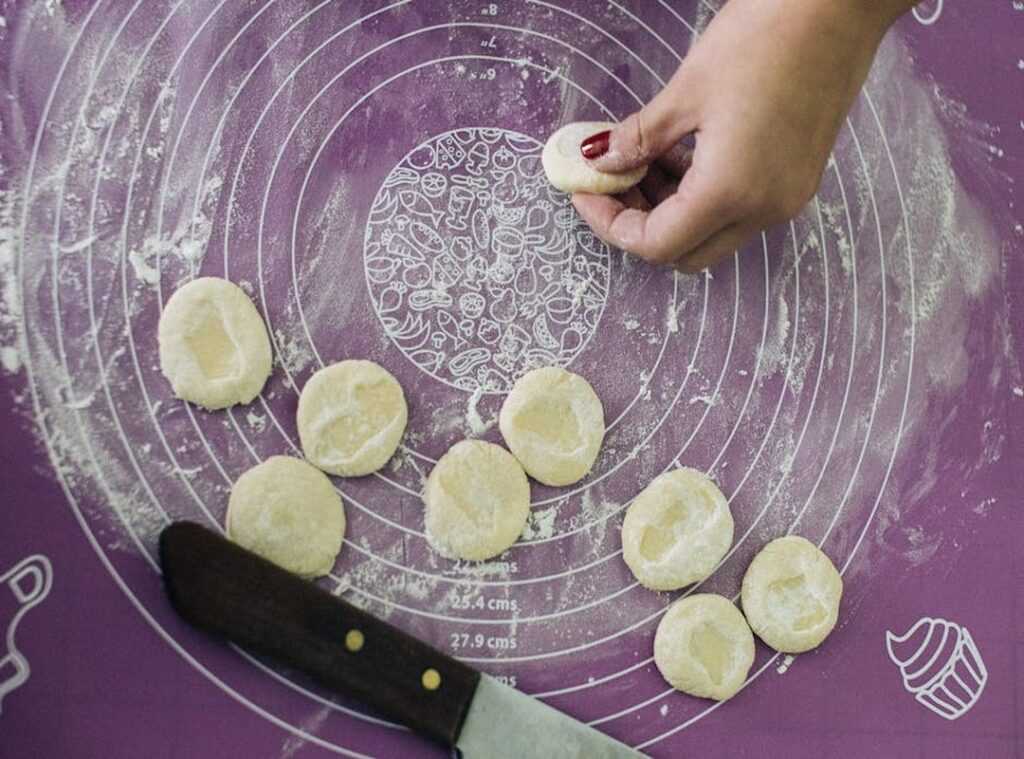
Step 3: Wrapping Is Where It All Falls Apart (or Holds Together)

I wrap Hingagyi every week. Not because I love it. Sometimes I curse the filling slipping out (but) because getting this step right means dinner actually works.
Place a heaping teaspoon of filling in the center of your dough circle. Not two. Not a mound.
One level-ish spoonful. Your future self will thank you.
Overfilling is the number one mistake. I’ve done it. You’ll do it.
The dough tears. The seal fails. Then you’re stuck scooping broken scraps off the tray while the oil heats up.
I go into much more detail on this in How many minutes to cook hingagyi.
Fold like you’re closing a book. Bring one edge over to meet the other. Press gently to trap air out.
Don’t pinch yet (just) get the shape right.
Now seal it tight. Dip your finger in water. Run it along the edge.
Just the barest line. Then press firmly with your thumb and forefinger, starting at the center and working outward. This isn’t optional.
Dry edges will pop open in the pan.
Think of it like folding a flag. Clean, deliberate, no gaps.
Set up an assembly line. One spot for wrappers. One for filling.
A small bowl of water beside it. A clean tray nearby for finished ones. No reaching.
No scrambling. Just rhythm.
You’ll go faster after six. Maybe slower on the first two. That’s fine.
How many minutes to cook hingagyi? That depends on size and heat (but) if your seal blew, timing doesn’t matter. You’ll just get soggy dough and loose filling.
This is where most people quit. They think it’s fussy. It’s not.
It’s just muscle memory you build by doing it wrong a few times first.
I keep mine small (about) the size of my palm. Bigger ones tear easier. Smaller ones seal better.
Don’t rush the seal. Don’t skip the water. Don’t overload.
That’s how to make Hingagyi step by step (without) losing half of it in the fryer.
You’ll know it’s right when it holds its shape while you lift it. Try it. Lift one.
If it sags or leaks, reseal it.
Step 4: Golden-Brown or Bust
I pan-fry hingagyi. Every time. Medium-high heat.
Two tablespoons of oil (not) one, not three. Just two.
You drop it in and leave it. No poking. No flipping early.
Three minutes. Set a timer. Seriously.
Flip once. Three more minutes. That bottom should be deep golden-brown and crispy (not) pale, not burnt, not “kinda brown.”
You’ll know it’s done when it smells nutty and the edges curl just slightly.
(Yes, that’s the smell you’re chasing.)
Steaming works. But it gives you soft edges and zero crunch. You trade texture for speed.
Not worth it unless you’re in a real pinch.
My pro tip? Pan-fry first, then cover and steam for 60 seconds. Crispy outside.
Tender inside. That’s how you nail it.
If you want to see how others pull this off. Especially the Allkyhoops hingagyi treasured burmese delicacy. Check out their full breakdown.
It’s the clearest How to Make Hingagyi Step by Step guide I’ve found.
Your First Pot of Hingagyi Is Ready to Simmer
I’ve given you How to Make Hingagyi Step by Step. No guessing, no missing steps.
You know what goes in first. You know when to stir. You know how long to wait before it smells like home.
Most people stop at the recipe and burn the garlic. Or skip the fish sauce rinse. Or use stale shrimp paste.
You won’t.
That sharp, funky, deep aroma? That’s not magic. It’s timing.
It’s heat control. It’s doing it right (once.)
You’ve got the roadmap. Now you need the pot.
So grab your biggest wok. Heat it up. Start tonight.
Because waiting means another meal of takeout. Another night where dinner feels like a chore.
This isn’t theory. It’s dinner (ready) in under an hour.
Go cook.
Click “Make It Tonight” and get the printable checklist sent straight to your phone. (We’re the #1 rated Hingagyi guide. 2,400+ cooks made it last week.)